
The speaker on the driver’s side door of my A4 stopped working so it was time to replace it. The sound quality from the standard speakers is not great so I saw this as an opportunity to do little bit of an upgrade. I am a bit of a novice at this sort of thing but after a lot of research I managed to achieve a very satisfactory outcome. This article describes the solution I went for and roughly the process of making the upgrade.
Components and tools
- Audi MDF Speaker Adapters: amazon.co.uk link
- JBL GTO 609C Speakers: amazon.co.uk link
- Audio Cable: amazon.co.uk link
- Self Adhesive Cable Holders: amazon.co.uk link
- Wire Crimps: amazon.co.uk link
- Bullet Connectors: amazon.co.uk link
- Wire crimping tool: B&Q link
- Car trim removal set: amazon.co.uk link
- Replacement Door Clips: amazon.co.uk link
- Phillips Screwdriver
- Torx Set
Audio system description
The B7 version of the Audi A4 was introduced in late 2004 and was made until 2009. It is essentially a face-lift of the B6 and so this information may also apply to that model as well. There were at least 2 speaker configurations: a higher end Bose system as well as a non-Bose version. Both have 10 speakers: a woofer and tweeter in each door, a small speaker in the centre of the dashboard under the windscreen and a sub-woofer on the rear parcel shelf. In the non-Bose setup the rear spears door speakers and sub-woofer are powered by a separate amplifier whereas the front speakers are powered by the head unit. In the Bose system all the speakers are powered by an external amplifier as well as using Bose components of course. The speaker sizes are identical in both setups.
Choosing components
The woofers in the door are 165mm and come as a complete unit including the mount. This means if you are replacing the speaker you need to buy a different mount. I have seen another blog which describes how to fit an aftermarket speaker into the existing mount. The advantage of that solution is that you can use the original speaker connectors. I decided, however, to buy aftermarket mounts as well. There are a few different types around and the one I finally went with are made from MDF, which supposedly will result in better sound quality.
I looked at a lot of speakers that would fit these mounts and were not too deep. Any deeper than 65mm and it would contact the window regulator. I also knew I needed component speakers rather than co-axial for optimal sound quality. Finally the speakers need to match my budget. I did a lot of googling and read a lot of reviews and ended up with the JBL GTO 609C These are a 6.5 Inch 2-way component speaker system which includes 2 midrange speakers and 2 tweeters as well as the crossovers.
These speakers did get very good reviews, but one of the main things they drew me to them was that JBL claim they have been optimised for use with the factory head unit and thin, standard wiring. The front speakers would be powered from the head unit and I wasn’t upgrading the rear amplifier or wiring so this seemed like a good choice. Although I wasn’t replacing the wiring from the doors to the head unit, I was installing some new wiring in the doors, so I ordered some additional speaker wire.
Removing door trim
The first step is to remove the door trim. This video describes the process:
With the door trim off you can remove the old speakers, I also trimmed the wire connectors as I’d be using bullet connectors instead. This is so that the panel can be easily taken off and on again in the future if any repairs to other components inside the door are required.
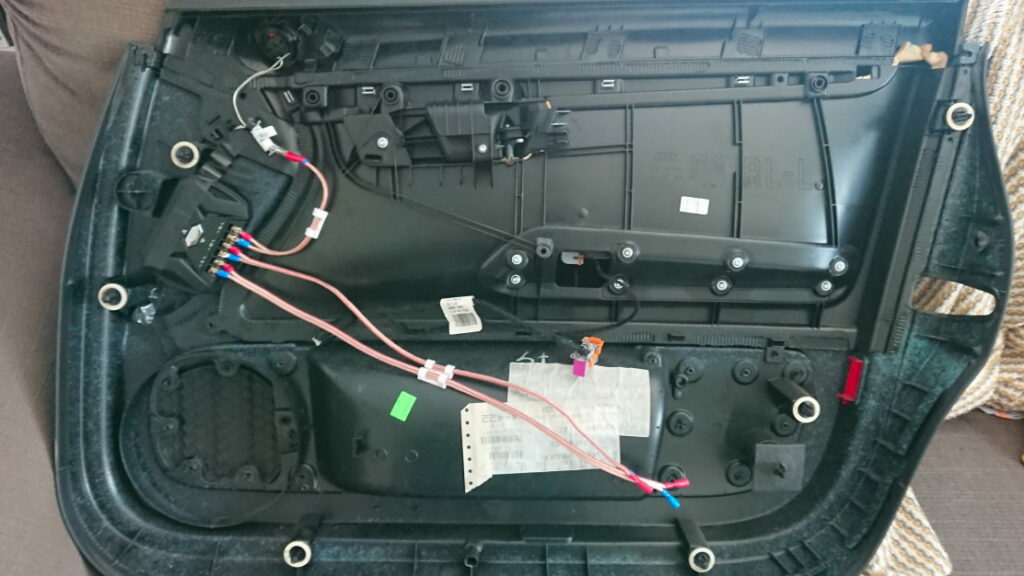
Inside the door trim
Inside the door trim I removed the stock tweeters and the wiring for this. Be very careful which wire you are removing as there is also wiring for the windows, mirrors and doors here as well. I decided to mount the crossovers to the inside of the door trim. There is a nice space toward the front of the door trim. I just glued them down with some gorilla glue, but it might be better to find a way to screw them down so they can be more easily removed in the future if required.
The image above shows where I mounted the crossover. I crimped on some fork connectors to the cable which are then screwed down into the crossover. The new tweeter was installed in the original location using a 3D-printed adaptor which I will describe in a different article. I used some self-adhesive cable holders to keep everything neat and in place.
There are 2 pairs of cables which need to go from the door trim to the door itself. I used the power window cable as a guide for how much cable I would need and trimmed them off to the same length and terminated them with bullet connectors.
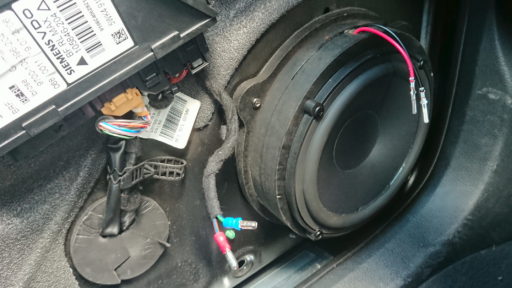
Inside the door
The woofer is installed inside the door itself. This is also where the wire from the head unit comes in. It’s important to get this the correct way around. I removed the head unit and checked the colour of the cables to see which was positive and negative. I then went back to the door and marked these with some coloured tape so I knew which was which. You can also use a polarity checker to confirm it’s correct. I installed an app on android simply called Polarity Checker. This should be used to confirm the polarity that you have already established rather than in isolation, as it’s not infallible.
I drilled a hole in the adaptor rings for the speaker cable and then screwed the woofers onto these before screwing them into the door. I crimped on some bullet connectors to the wires from the speaker and the wires coming from the head unit. The cable route is therefore: from head-unit to the inside of the door, then from the door to the crossover in the door trim, then back from the crossover back to the door and into the speaker.
Reassembly
Once all the speakers and installed and the wires connected it’s time to put it back together. Some of the original door clips are bound to have broken during the trim removal so replace these before re-installation. The refit is the reverse of removal, just make sure the connectors for the door handle and power windows all work before final attachment. This saves having to remove everything again when you later discover the windows don’t work and you can’t open the door from the inside! I found that it was slightly easier to align the trim with the window down. You can power all the windows down using the key fob: simply hold the unlock button for a few seconds.
Final thoughts
This job was fairly straight forward for a novice. It took me a couple of attempts because I had to dismantle everything in order to figure out how I was going to approach the problem before ordering the bits I needed. Hopefully this guide will allow anyone attempting their own audio upgrades to buy everything ahead of time and do it all in one go. The hardest bit was mounting the tweeter as none of the supplied adaptors were a good match. If you have access to a 3D printer this is the best solution, if not: try to preserve as much of the original tweeter mount as possible and use some foam padding before clipping it in.
If you found this guide helpful then please leave a comment below.